


Introduction
Although it’s true that the current Adobe Acrobat Sign web interface offers an intuitive and efficient way to create and manage web forms, the frontend interface isn’t utilizing every available feature built into Acrobat Sign’s backend APIs. In this blog, we will look at using the /widget API method to build a custom web form with the hidden interface features URL Redirect and Delay parameters added. The form will also two participants who will be required to sign; the user who initiated the web form and a counter-signer who receives the signed web form.
Requirements
To begin, let’s verify you have the following requirements in place:
- An Adobe Acrobat Sign account to access the REST API Methods Documentation swagger page. If you do not have access to your production APIs, there are Adobe trial and developer accounts you can create for free so you can follow along.
- Acrobat Sign either under one of the two menus:
- From Account (or Group) > Acrobat Sign API > API Information menu, OR
- From API > Acrobat Sign API > API Information menu.
- Documented the Library Document ID for the Acrobat Sign document to be used with the web form. Open a Template from the Manage > Templates menu links and aument the Library Template ID found in the URL value between /view/ and ?Type details.

- Document the Group ID for the group to be used with the web form.
- As a Site administrator, click Account > Groups > select Group > Open, or as a Group administrator, click the Group menu. Click the Group Settings link to view the Group ID value.
- You ensured that your account is a member of this group, and that you have Send permissions enabled.
Access the Web Form API
Log into Adobe Acrobat Sign at https://secure.na1.adobesign.com/public/login and open your REST API Methods Documentation mentioned above.
On the Acrobat Sign REST API Version 6 Methods page that opens, find the section Resources and Operations and then widgets : Web forms API call.
Click widgets : Web forms to expand and then click to expand POST /widgets to view the details of the API call.
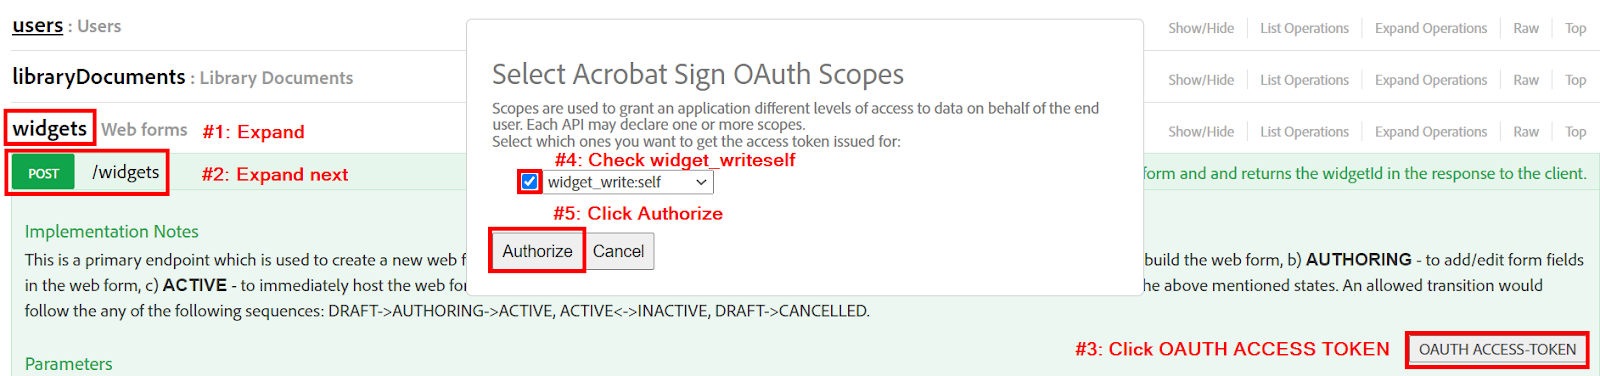
In order to make an API request on behalf of your user account, we will need to create an access token by clicking on the button OAUTH ACCESS TOKEN.
This will prompt to create an access token with the widget_writeself scope set by default. Check the box and then click Authorize to grant the required permission.
Scroll down until you see the WidgetInfo field. This field (text box) can be populated by clicking the Minimal Model Schema or Complete Model Schema links, or by pasting an existing JSON schema.
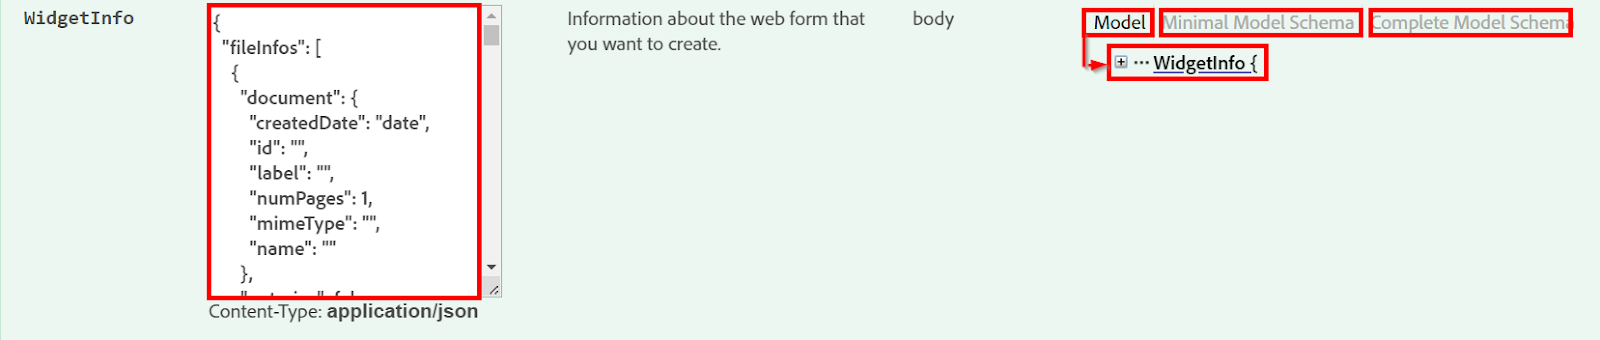
We will focus on the pre-built JSON schema below, but you can learn about all the available web form settings available by clicking on the Complete Model Schema and +•••WidgetInfo { links seen here.
Configuring your Web Form JSON Schema
Copy the syntax lines from the boxes below in order. I’ve broken the JSON schema into parts and highlighted the template variables to paste your requirement values into.
A left curly bracket is used to start the JSON schema.
{
We require the web form name and state key value pairs, but the groupid is optional. If it is not provided, the user’s Primary group will be used.
"name": "Agreement Name",
"state": "ACTIVE",
"groupId": "CBJCHBCAABAAJ66E3dJ6UuLUx0FAEnPVOhNkh1rwVhzD",
The fileInfos will define your document(s). You could use a transient document if you uploaded one via the APIs, or use your libraryDocumentId from your template’s URL.
"fileInfos":
[
{
"libraryDocumentId": "CBJCHBCAABAAS0_kliRKpWVa8wSsES22YO111xdT3lMg"
}
],
widgetParticipantSetInfo: The first form filler who is accessing the web form is defined here.
Note: This section can only be used once in the array currently with the “email” key value remaining empty and the “role” key set to either SIGNER, APPROVER, ACCEPTOR or FORM FILLER only.
"widgetParticipantSetInfo":
{
"memberInfos":
[
{
"email": "",
"id": "",
"name": "",
"nameInfo":
{
"firstName": "",
"lastName": ""
},
"password": ""
}
],
"role": "APPROVER"
},
Here is our hidden web form interface feature which allows your web form to redirect the form filler to the URL provided with a delay measured in seconds.
Note: If you set the delay to 0 seconds, it will hide the web form screen after signing which offers the form filler the option to download a copy of the agreement.
"completionInfo":
{
"url": "https://www.aftia.com/blog/building-a-custom-web-form-from-api",
"deframe": false,
"delay": 3
},
Configuring the Counter-Signer who will receive the signed agreement after the Form Filler.
"additionalParticipantSetsInfo":
[
{
"memberInfos":
[
{
"email": "",
"id": "",
"name": "",
"nameInfo":
{
"firstName": "",
"lastName": ""
}
}
],
"role": "SIGNER",
"order": 1,
"providerParticipantSetInfo":
{
"actionRequired": false,
"actionDescription": ""
}
}
]
And finally, we close off the WidgetInfo section by using a right curly bracket to end the JSON schema Object.
}
Now that we have our schema created, we can paste it into the WidgetInfo field (text box) and click the button Try it out!
You will know your form was successfully created when a Web Form transactionID is returned by the API. Once your web form is generated, it will be visible under the Manage > Web Forms area of Acrobat Sign.
.svg)
.svg)
.svg)