


Introduction
In a previous blog, “Building a Custom Web Form from API”, I discussed how you can build an Adobe Acrobat Sign Web Form which utilizes API only features such as the Redirect URL and Delay settings. This time we will look at automating the archiving of signed Web Forms with the help of Microsoft’s Power Automate flows.
After All Participants Sign
After all your participants have completed their actions in the document signing ceremony, a copy will remain on Adobe’s cloud servers while the account is active, or as long as your enabled retention settings specify. While Adobe’s secure data centers suffice for most businesses, other organizations may be required to follow policies or regulations requiring business data be stored on privately owned data servers. Other reasons to archive your agreements could include document redundancy, ease of access, a need to index and search agreement data, adhering to corporate or industry standards, or to perform further data processing.
Introducing Microsoft Power Automate
With the help of Microsoft Power Automate flows, users can create a list of instructional steps that can monitor Acrobat Sign for completed agreements, and then save the agreements through a variety of available applications.
Setup Requirements
To begin, you should confirm your access to Microsoft Power Automate (a process automation tool) and Adobe Acrobat Sign. For the simplicity of this blog, it is best to speak with your Adobe representative or IT Department to verify and gain the proper access.
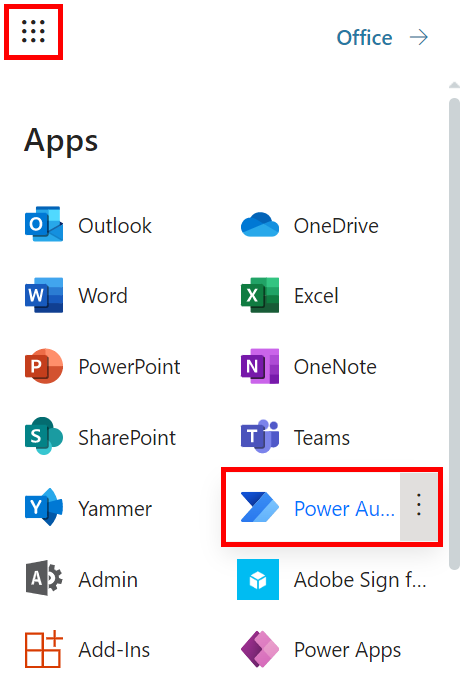
Begin by logging into Office 365, then click on the waffle icon in the top-left corner, and then click Power Automate from the list of Apps.
From the Power Automate menu, select My Flows > New flow > Automated cloud flow.
Provide a Flow name and type “adobe” into the Choose your flow’s trigger field, then select the trigger When an agreement workflow is completed. This trigger will notify Power Automate of completed Adobe agreements so that the flow can take action based on the instructions we provide it. Once the trigger is selected, click the Create button.

The following Power Automate steps will allow you to monitor your completed agreements and save them to a file in SharePoint. I selected Microsoft SharePoint in this example, but you can explore alternative storage connectors for your signed agreements.
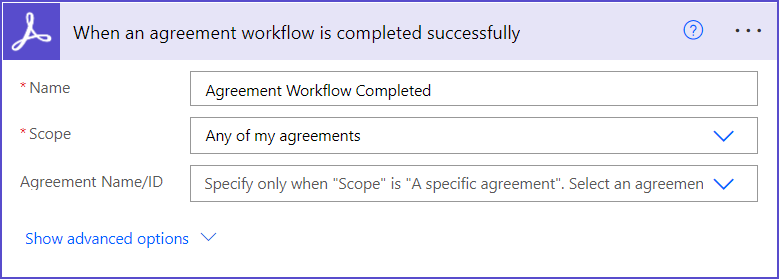
Step 1: The trigger “When an agreement workflow is completed successfully” determines the scope of the agreements that trigger the flow. When the participants of the agreement complete their signing ceremony, Power Automate will receive a notification from Acrobat Sign. This notification will include several details related to the agreement which decisions can be based on.
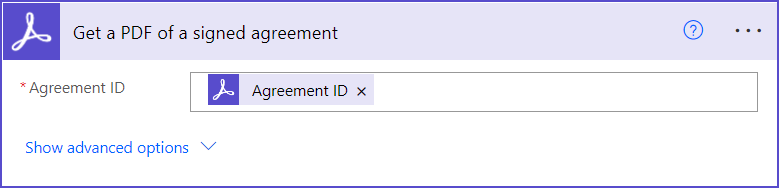
Step 2: The Agreement ID value from Step 1’s output will be used as an input to Step 2. There are many values we can reference from the Step 1 notification, but our focus will be on retrieving the signed PDF contents. To get the contents of the completed agreement, use the “Get a PDF of a signed agreement” call and pass the output of Step 1, Agreement ID, as the input for the Agreement ID field in Step 2.
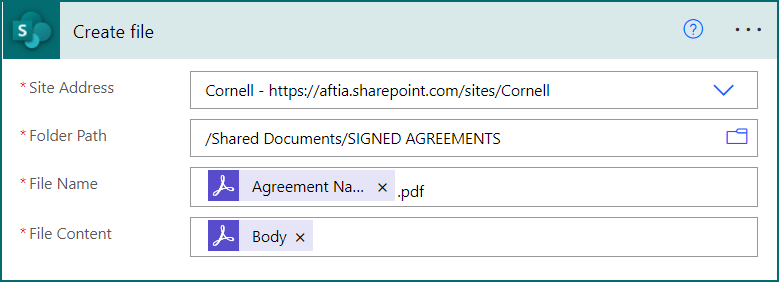
Step 3: The final step in our example will create a file with your agreement contents and save it in a SharePoint folder. Using the output values retrieved in Step 2, Agreement Name and body will be used to name the SharePoint file and provide the file contents.
To complete the flow, click Save.
You can test the flow by clicking Test in the top-right, then choose Manually to trigger the flow, and then click Test.
When an agreement is completed, a copy of it will be saved automatically to the selected SharePoint location.

If you wish to learn more about Power Automate, click here.
.svg)
.svg)
.svg)